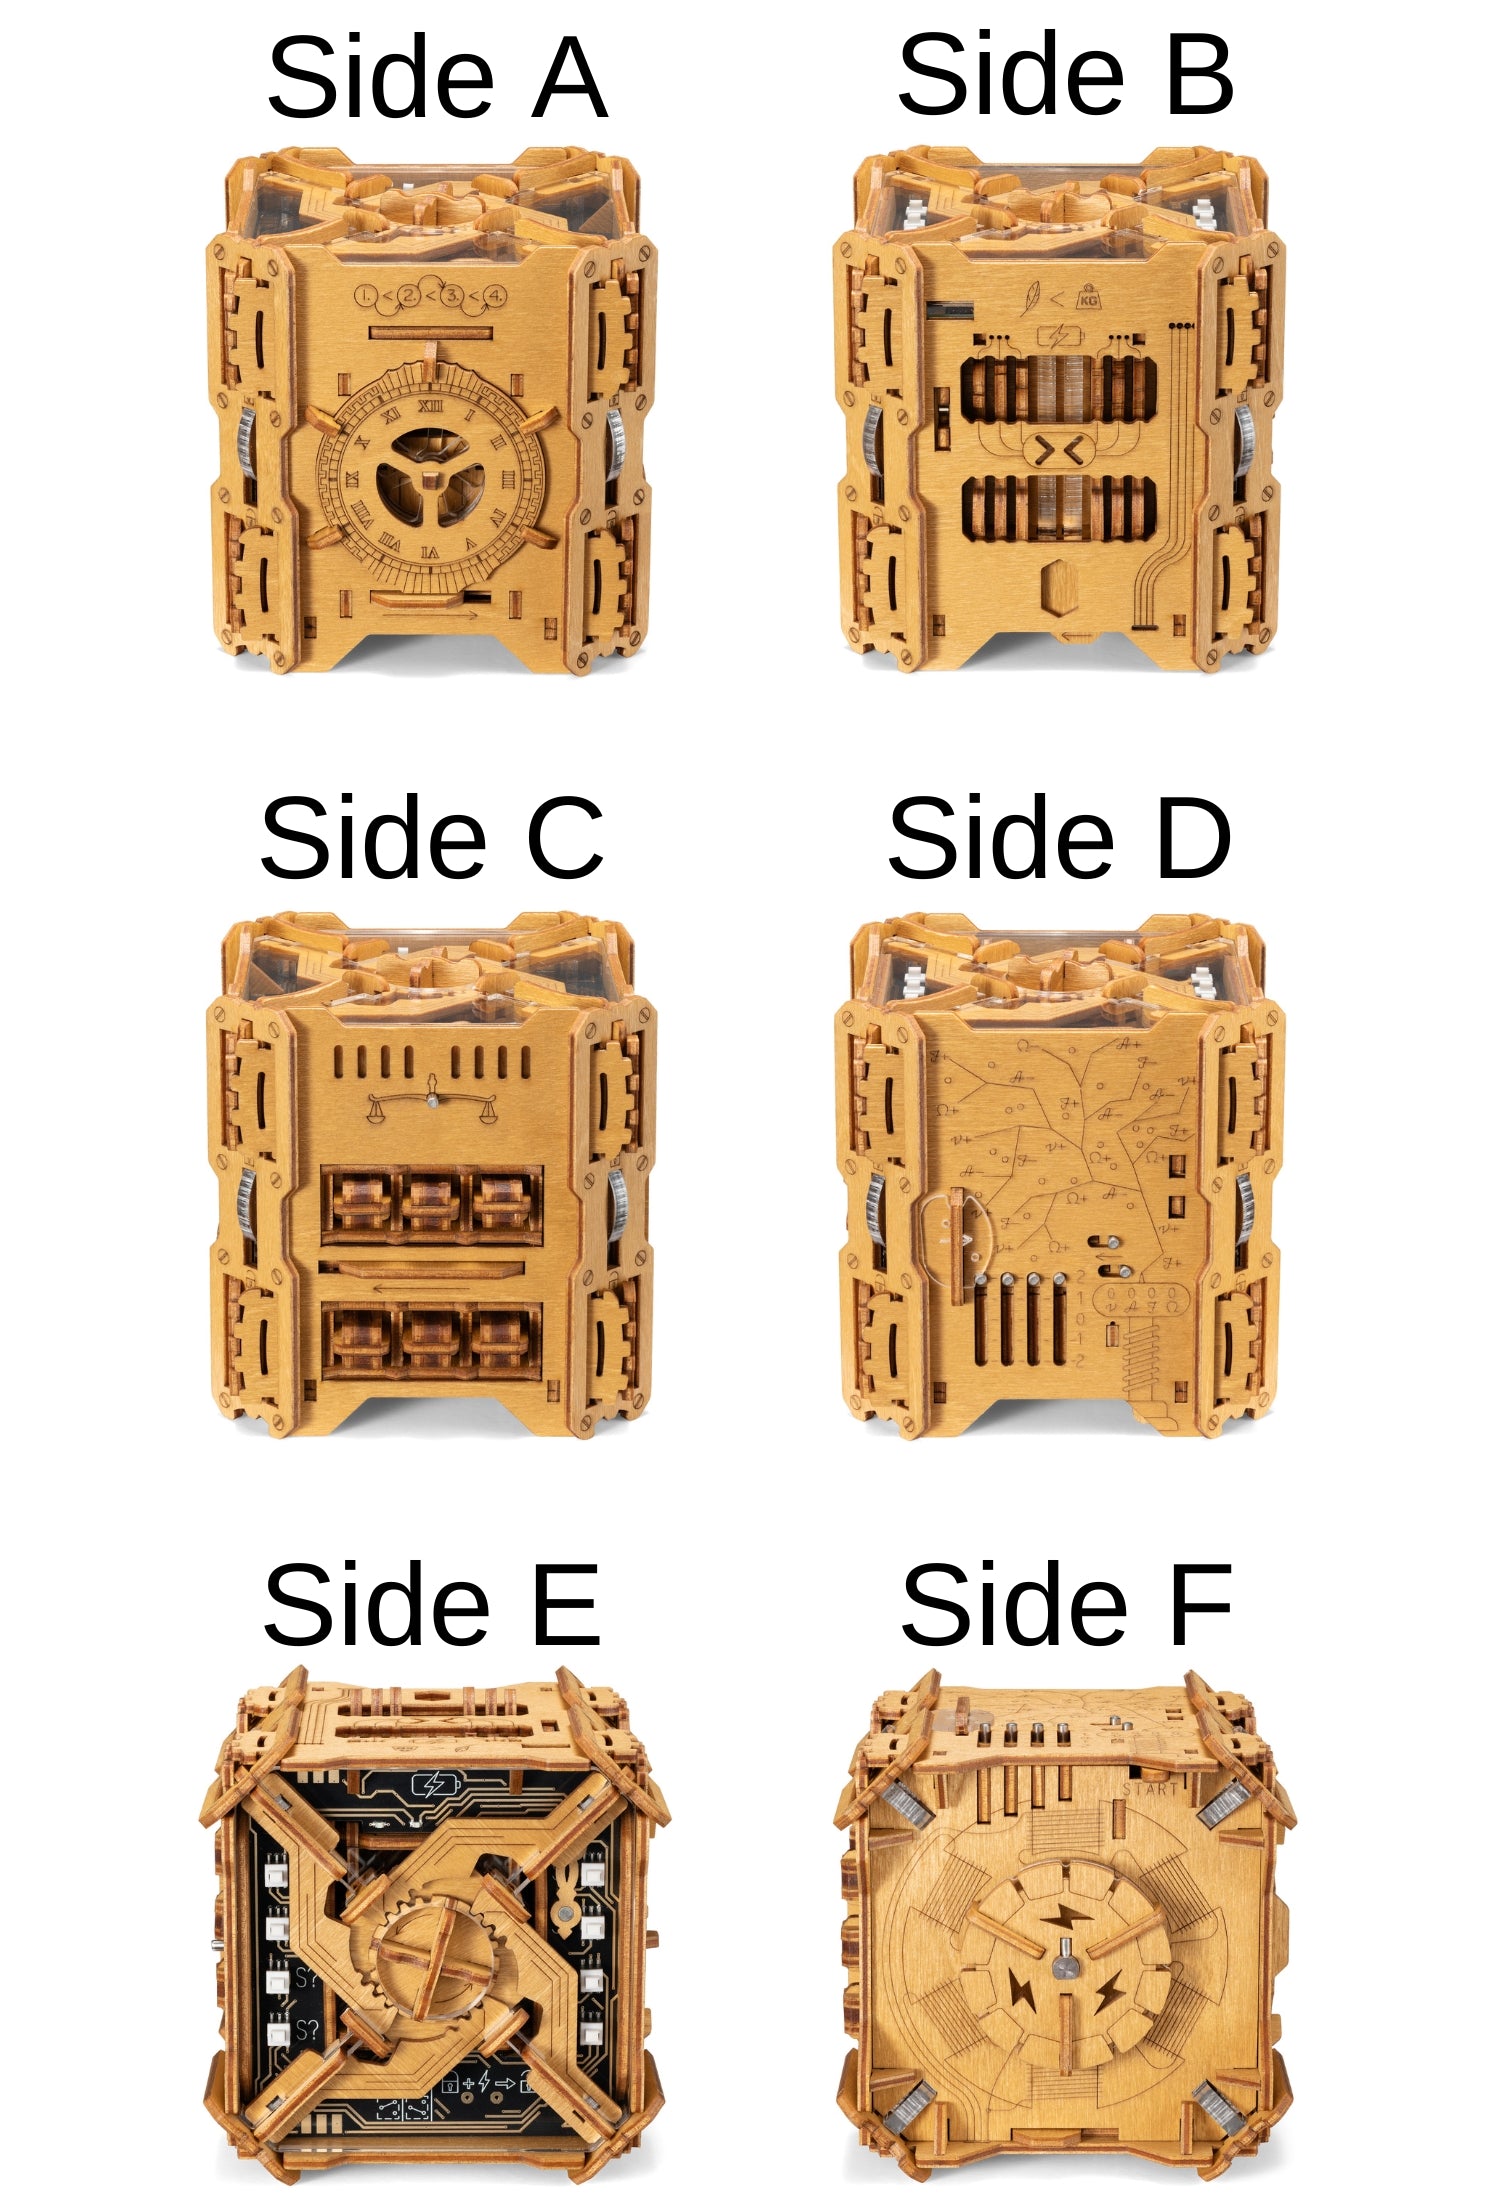
Hinweise und Anleitungen: Tesla Box
Allgemeine Hinweise
Tipp
Für diese Puzzle-Box empfehlen wir, Stift und Papier zu verwenden, um deinen Fortschritt aufzuschreiben. Andernfalls ist es schwierig, den Überblick zu behalten.
Hinweis 1
Das Ziel besteht darin, die Puzzlebox zu öffnen und ihren Inhalt preiszugeben.
Hinweis 2
Zunächst musst du eine Reihe von Rätseln lösen. Ziel der ersten Rätsel ist es, alle vier Acrylschieber an jeder Kante der Box zu entriegeln.
Hinweis 3
Zuletzt kannst du den Acryldeckel auf Seite E abnehmen, wodurch das letzte Puzzle zum Vorschein kommt.
Fehlerbehebung
Schieber klemmt?
Die Tesla-Box ist eine sequentielle Puzzle-Box, das heißt, sie kann nur in einer bestimmten Reihenfolge gelöst werden. Jeder Schritt baut auf dem vorherigen auf.
Stelle in diesem Sinne zunächst sicher, dass der horizontale Schieberegler aus dem vorherigen Schritt vollständig in seine gelöste Position verschoben wurde.
Überprüfe auch die Position der vertikalen Acrylschieber. Wenn sich der vertikale Acrylschieber neben dem aktuellen Puzzle nicht in der oberen oder unteren Position befindet, kann der horizontale Schieber nicht bewegt werden.
Energie
Hinweis 1
Um alle Hinweise zu lösen, ist bei diesem Rätsel elektrische Energie erforderlich. Kannst du herausfinden, woher die Energie kommt?
Hinweis 2
Finde ein großes Rad, das du nach links und rechts drehen kannst?
Hinweis 3
Hast du das Rad auf Seite F gefunden? Drehe es nach rechts und links. Aber nicht zu langsam.
Lösung
Wenn du das große Rad auf Seite F nach links und rechts drehst, solltest du sehen, wie die Puzzlebox zu blinken beginnt.
Durch Weiterdrehen des Rades lädt sich die Box auf, bis die Lichter durchgehend grün leuchten. Das bedeutet, dass sie vollständig geladen ist.
Sobald du aufhörst das Rad zu drehen, entlädt sich die Box langsam, bis die Lichter aufhören zu blinken.
Rätsel I
Hinweis 1
Finde das Wort "START"
Hinweis 2
Hat das Betätigen des Hebels auf Seite F neben dem Wort „START“ ein Teil herausgedrückt?
Hinweis 3
Was kann gewogen werden?
Hinweis 4
Auf Seite C befinden sich 6 Objekte in 6 Löchern. Zieh sie heraus.
Hinweis 5
Auf der Seite C befindet sich ein Metallstift, der herausgezogen werden kann. Versuche, die kleinen Gewichte mit der Wiegevorrichtung und diesem Stift zu wiegen.
(Hinweis am Rande: Da dies bereits viele Male ausprobiert wurde, eine Küchenwaage oder Briefwaage wird dir nicht die richtige Antwort liefern. Das Wiegeergebnis hängt zusätzlich noch von der Position des Schwerpunkts jedes Objekts ab!)
Hinweis 6
Die Objekte können nicht gewogen werden, indem man sie von vorne auf die Wiegevorrichtung aufsetzt. Hast du versucht, sie von der Seite aufzusetzen?
Hinweis 7
Sortiere die Objekte in aufsteigender Reihenfolge. Von leicht bis schwer.
Hinweis 8
Nun gilt es herauszufinden, welches der 6 Objekte in welches Loch gehört.
Hinweis 9
Kannst du die Symbole im Inneren der Löcher noch woanders finden? Suche auch nach Formen.
Hinweis 10
Hast du auf der Seite mit den beiden vertikalen Acrylbalken in der Mitte und den 6 Schiebereglern daneben (Seite B) sehr ähnlich aussehende Formen gefunden?
Hinweis 11
Kannst du die beiden vertikalen Acrylstäbe in der Mitte zum Leuchten bringen?
Hinweis 12
Hast du probiert mehr als einen Schieberegler gleichzeitig nach oben zu drücken?
Hinweis 13
Was bedeutet das dreieckige/pfeilförmige Symbol in der Mitte, wenn der Acrylbalken dahinter leuchtet?
Hinweis 14
Erinnert dich dieses dreieckige Symbol an ein mathematisches Symbol? Zum Beispiel beim Vergleichen einer Seite einer Gleichung mit der anderen.
Hinweis 15
Vergleiche die Formen auf den Schiebereglern. Kannst du eine Reihenfolge finden und was sagt dir diese Reihenfolge?
Hinweis 16
Wie ist die Beziehung zwischen dieser Reihenfolge und den gewogenen Objekten?
Hinweis 17
Schließlich solltest du eine aufsteigende Reihenfolge der Tasten (leicht bis schwer) und eine aufsteigende Reihenfolge der Symbole gefunden haben. Stecke die Objekte in die entsprechenden Löcher, entsprechend der Reihenfolge der Symbole.
Hinweis 18
Nachdem du alle 6 Objekte in das richtige Loch gesteckt hast, solltest du den mittleren horizontalen Holzschieber nach links bewegen können. Wird dadurch noch etwas anderes freigegeben?
Hinweis 19
Du solltest nun in der Lage sein, den ersten vertikalen Acrylschieber am Rand der Box in die entriegelte Position zu bewegen. Es handelt sich um den Schieber rechts neben den 6 Löchern.
Lösung
Auf der Seite F neben dem Wort „START“ befindet sich ein Hebel. Drücke ihn, um den „Wiegebalken“ von der Seite B zu lösen und herauszuziehen. Dieses Teil dient zum Wiegen.
Zieh auf Seite C alle sechs Objekte/Schlüssel heraus. Auf Seite C befindet sich in der Mitte ein Metallstift. Ziehe daran.
Befestige nun die sechs Objekte paarweise an den Magneten links und rechts des Wiegebalkens von der Seite (nicht von vorne). Indem du den mittleren Teil des Balkens auf den Metallstift der Puzzle-Box schiebst, kannst du die sechs Objekte wiegen und so die Reihenfolge vom leichtesten bis zum schwersten bestimmen.
(Hinweis am Rande: Da dies bereits viele Male ausprobiert wurde, eine Küchenwaage oder Briefwaage wird dir nicht die richtige Antwort liefern. Das Wiegeergebnis hängt zusätzlich noch von der Position des Schwerpunkts jedes Objekts ab!)
Auf Seite B befinden sich sechs vertikale Schieber, die jeweils mit einem Knopf verbunden sind. Jeder Schieber korrespondiert mit einem Symbol, das sich in den sechs Löchern auf Seite C befindet. Lade die Tesla-Box auf und drücke gleichzeitig jeweils einen Schieber von der linken und rechten Seite. Ein blaues Licht zeigt an, welche Seite schwerer ist, dargestellt durch das größer/kleiner Symbol vor dem Licht.
Teste alle Schieberegler-Kombinationen und notiere dir die Beziehungen zwischen den Symbolen. Durch die Kombination aller gesammelten Informationen kannst du die Reihenfolge der Symbole vom schwersten bis zum leichtesten bestimmen.
Zum Schluss stecke die gewogenen Objekte vom schwersten bis zum leichtesten wieder in die Löcher zurück.
Die Lösung ist unten dargestellt: Nummer 1 stellt das leichteste Objekt dar und Nummer 6 den schwersten.

Rätsel II
Hinweis 1
Das nächste zu lösende Rätsel ist das mit der Teslaspulen-Gravur (Seite D).
Hinweis 2
Kannst du auf dieser Seite einen der beiden horizontalen Metallstiftschieber bewegen? Wenn nicht, prüfe, ob der vertikale Acrylschieber, den du im vorherigen Schritt entriegelt hast, vollständig in der entriegelten Position verschoben wurde.
Hinweis 3
Wenn du den unteren horizontalen Schieber nach links bewegst, sollten alle 4 vertikalen Metallstiftschieber freigegeben werden.
Hinweis 4
Hast du die kleine Acrylplatte herausgezogen, die von den vier vertikalen Metallstiftschiebern an ihrem Platz gehalten und verriegelt wurde?
Hinweis 5
Stimmen die beiden Löcher auf der Acrylplatte mit der Gravur auf Seite D überein?
Hinweis 6
Welche Information bekommst du, wenn die Löcher mit der Gravur übereinstimmen?
Hinweis 7
Was erfährst du beim Folgen des Blitzes ausgehend von der Teslaspule über die vier Metallstiftschieber und ihre Positionen?
Hinweis 8
Bevor du beginnst, dem Blitz zu folgen, schiebe alle vier vertikalen Schieber in die Nullposition.
Hinweis 9
Bist du dem Blitz bis zum Ende gefolgt? Das kleine Acrylplatten-Werkzeug sollte dir helfen, an jeder Kreuzung zu entscheiden, welchen Weg du nehmen musst. Eventuell musst du die Acrylplatte auch umdrehen.
Hinweis 10
Entlang des Wegs stehen einige Symbole.
Wie müssen die 4 vertikalen Schieberegler entsprechend der Symbole verschoben werden?
Hinweis 11
Nachdem du alle vier vertikalen Schieberegler in die richtige Position geschoben hast, solltest du den oberen horizontalen Schieberegler nach links bewegen können. Wenn nicht, versuche, die vier vertikalen Schieberegler ein wenig hin und her zu wackeln. Manchmal ist das leider notwendig, damit sie Schieber perfekt ausgerichtet sind.
Hinweis 12
Nachdem der obere horizontale Stiftschieber nach links bewegt wurde, sollte er den nächsten vertikalen Acrylschieber an der rechten Kante dieses Puzzles entriegeln.
Lösung
Bewege den unteren horizontalen Schieber nach links. Dadurch sollten alle vier vertikalen Metallstiftschieber freigegeben werden.
Bewege die vertikalen Schieber nach unten und entferne das durchsichtige Acrylplättchen. Richte die Löcher im durchsichtigen Acrylplättchen an den kreisförmigen Markierungen neben den Verbindungsstellen der Blitzgravur aus. Du kannst auch versuchen, das Acrylplättchen auf die andere Seite zu drehen. Bewege alle vier vertikalen Schieber auf die Position 0. Als nächstes, verfolge den Blitz bis zum Ende beginnend bei der Teslaspule. Nutze dafür das Acrylplättchen um bei jeder Kreuzung die richtige Richtung zu finden. Der Pfeil auf dem Plättchen kann an jeder Kreuzung nur in einer Richtung ausgerichtet werden. Unterwegs befinden sich Anweisungen zu jedem Schieber, die angeben, ob ein Schieber eine Position nach oben oder eine Position nach unten verschoben wird. Wenn du das Ende erreicht hast, sollten sich die vier Schieber in den im Bild unten gezeigten Positionen befinden.
Nun lässt sich der obere Slider auch nach links verschieben.

Rätsel III
Hinweis 1
Das nächste zu lösende Rätsel ist das mit dem Zifferblatt auf Seite A.
Hinweis 2
Schaue in die Mitte des Zifferblatts. Hast du die Gravur im Loch entdeckt?
Hinweis 3
Welches Werkzeug hast du bereits bekommen, das dieser Gravur ähnlich sieht?
Hinweis 4
Versuche, die drei Acrylscheiben im Loch so zu verschieben, sodass sie alle gleich ausgerichtet sind und eine Lücke frei wird. Vielleicht kannst du den Magneten an den Enden des Werkzeugs verwenden?
Hinweis 5
Kannst du mit dem Werkzeug den Hebel im Loch in der Mitte vom Ziffernblatt hineindrücken? Löst sich dadurch etwas?
Hinweis 6
Das erste befreite Objekt ist eine Karte mit neuen Hinweisen. Hast du auch das zweite Objekt bekommen? Schau durch die transparente Oberseite auf Seite E. Siehst du etwas im Inneren liegen?
Hinweis 7
Lege den Uhrzeiger auf das Ziffernblatt. Achte darauf, dass die Gravur auf dem Uhrzeiger zu dir zeigt.
Hinweis 8
Kommen dir die Formen oder Teile der Formen, die auf der gerade extrahierten Karte eingraviert sind, bekannt vor?
Hinweis 9
Vergleiche die Formen mit Seite B.
Hinweis 10
Kannst du die Seite B erneut verwenden, um dieses Rätsel zu entschlüsseln? Was kann dieses Mal verglichen werden?
Hinweis 11
Hast du versucht, mehr als einen Schieberegler pro Seite gleichzeitig zu drücken?
Vergleiche zwei Formen mit zwei anderen Formen, um eine Sequenz zu finden.
Hinweis 12
Nachdem du die Reihenfolge gefunden hast, weißt du nun, wie man den Uhrzeiger dreht? Dreht man von Schritt zu Schritt im oder gegen den Uhrzeigersinn?
Hinweis 13
Geben die Pfeile über dem Zifferblatt einen Hinweis auf die Drehrichtung?
Hinweis 14
Nachdem du die richtige Sequenz in die Uhr eingegeben hast, solltest du den horizontalen Schieberegler unter der Uhr von links nach rechts bewegen können.
Wenn sich der Schieberegler nicht bewegt, überprüfe noch einmal ob sich beim vorherigen Puzzle alle Slider in der gelösten Stellung befinden. Zudem sollte der vertikale Acryl Slider in der unteren (entriegelten) Stellung sein.

Hinweis 15
Nachdem du den horizontalen Schieberegler nach rechts verschoben hast, sollte der nächste vertikale Acryl-Schieberegler rechts neben dem Zifferblatt freigeschaltet werden.
Lösung
Zuerst musst du einen weiteren Hinweis freilegen. Unter dem Zifferblatt befindet sich ein Magnet, der mit der oberen durchsichtigen Scheibe verbunden ist.
Bewege die drei Scheiben mit dem Magneten am Wiegestab, so dass oben eine Öffnung entsteht. Stecke den Wiegestab in diese Öffnung. Dadurch wird ein kartenähnlicher Gegenstand direkt über dem Zifferblatt freigegeben. Durch Entfernen des kartenähnlichen Gegenstands kann außerdem der Uhrzeiger unter dem durchsichtigen Acryl auf Seite E herausgenommen werden. Lege den Uhrzeiger auf das Zifferblatt mit der Gravur zu dir zeigend.
Auf dem kartenähnlichen Objekt sind vier Uhrzeiten markiert: 3, 6, 9 und 11 Uhr. Neben jeder Markierung sind zwei Formen graviert. Diese Formen entsprechen den Formen der sechs Schieberegler auf Seite B. Durch gleichzeitiges Drücken von zwei Formen auf jeder Seite kann man eine Reihenfolge finden. Die Logik ist dieselbe wie bei Rätsel 1.
Die richtige Reihenfolge der Uhr ist 3 -> 6 -> 11 -> 9, wobei man zuerst gegen den Uhrzeigersinn von 3 auf 6 dreht, dann im Uhrzeigersinn von 6 auf 11 und schließlich gegen den Uhrzeigersinn von 11 auf 9.
Nachdem du die richtige Sequenz in die Uhr eingegeben hast, solltest du den horizontalen Schieber unter der Uhr von links nach rechts bewegen können.
Wenn sich der Schieber nicht bewegt, lese bitte den Abschnitt zur Fehlerbehebung oben.


Rätsel IV
Hinweis 1
Kannst du nun einen weiteren Schieber finden, der sich nun frei bewegen lässt?
Hinweis 2
Hast du ihn auf Seite B gefunden? Nachdem du diesen Schieber auf die andere Seite verschoben hast, solltest du nun ein Umkehr-Symbol sehen. Was bedeutet das?
Hinweis 3
Vielleicht musst du jetzt zurückgehen, anstatt weiter vorwärts zu gehen?
Hinweis 4
Verfolge deine Schritte zurück.
Hinweis 5
Bewege den mittleren Schieber auf Seite C nach rechts, um den letzten vertikalen Acrylschieber freizugeben. Aber wie geht das?
Eventuell lassen sich alle horizontalen Schieber nur nacheinander verschieben.
Lösung
Schiebe jeden horizontalen Schieber zurück in seine Ausgangsposition (entgegen der Pfeilrichtung). Um dies zu erreichen, musst du Schritt für Schritt zurückgehen (in umgekehrter Reihenfolge, in der du das Rätsel gelöst hast). Lass den Schieber mit dem Umkehr-Symbol in der Position, in der das Symbol zu sehen ist.
Stell außerdem sicher, dass beim Zurückgehen die vertikalen Acrylschieber sich in der entriegelten Position befinden.
Nachdem alle horizontalen Schieber zurückgeschoben wurden, sollte sich nun auch der letzte vertikale Acrylschieber in die entriegelte Position bewegen lassen.
Kannst du jetzt den durchsichtigen Acryldeckel auf Seite E abnehmen?
Rätsel V
Hinweis 1
Dieses Puzzle wird sichtbar, wenn man den durchsichtigen Acryldeckel abnimmt. Es ist das Puzzle mit den 8 Tasten auf der Leiterplatte.
Tipp: Benutze Stift und Papier! Du musst deinen Fortschritt aufschreiben.
Hinweis 2
Hast du den Hinweis gefunden, der auf der Unterseite des Deckels eingraviert ist?
Hinweis 3
Gibt es Ähnlichkeiten zwischen der Gravur auf der Deckelunterseite und den Markierungen auf der Leiterplatte?
Hinweis 4
Kannst du herausfinden, welche vier Tasten du gleichzeitig drücken musst, um das elektronische Schloss mit Strom zu versorgen?
Hinweis 5
Auf der Unterseite des Deckels ist ein kleiner Schaltplan eingraviert. Kannst du den Knopf finden, der das erste Licht aufleuchten lässt?
Hinweis 6
Was passiert, wenn du gleichzeitig die Taste drückst, die das erste Licht aufleuchtet, und eine der anderen Tasten? Geht das Licht in irgendeiner Kombination aus? Was sagt dir das?
Hinweis 7
Kannst du diese Logik für die restlichen Lichter fortsetzen? Versuche, durch Drücken von Tastenkombinationen nacheinander die Lichter aufleuchten zu lassen. Am Ende solltest du wissen, welche vier Tasten das elektronische Schloss mit Strom versorgen.
Hinweis 8
Stelle sicher, dass Sie genügend Energie aufgeladen hast, um das elektronische Schloss zu aktivieren. Dreh das Generator-Rad, bis sie grün leuchtet.
Lösung
Lade zunächst die Box auf, bis sie grün leuchtet. Drücke dann die 4 auf dem Bild unten gezeigten Tasten, um das elektronische Schloss zu öffnen.
(Achte darauf, dass die Platine genauso orientiert ist wie im Bild)
Nach dem gleichzeitigen Drücken aller 4 Tasten sollte sich die kleine Schachtel in der Mitte lösen. Ziehe es heraus.

Rätsel VI
Hinweis 1
Du solltest nun eine kleine Schachtel mit durchsichtiger Ober- und Unterseite in der Hand halten.
Hinweis 2
Eine der durchsichtigen Seiten lässt sich abnehmen. Aber wie?
Hinweis 3
Auf einer Seite der kleinen Box ist ein Pfeil eingraviert. Kannst du irgendwo anders auf der Tesla-Box einen ähnlichen Pfeil finden?
Hinweis 4
Lege die Schachtel wieder in die Tesla-Box. Achte auf die Pfeile!
Hinweis 5
Nachdem du die Schachtel mit den Pfeilen auf der gleichen Seite und in der gleichen Ausrichtung in die Tesla-Box gelegt hast, versuche, am Schieber der kleinen Box zu ziehen.
Stelle sicher, dass die Tesla-Box auf einer horizontalen Fläche steht.
Hinweis 6
Die durch den Schieber festgehaltene transparente Platte kann nun herausgenommen werden.
Herzlichen Glückwunsch! Du hast die Tesla-Box gelöst!
Schnell Löse Anweisungen

Anweisungen zum Zurücksetzen
